Like Fish Tails on Facebook!

Monday, April 27, 2015

It's the Little Things

Fishing's not a sport for quitters.  It doesn't tolerate a lack of patience.  Fishing absolutely demands that you take  notice of the beauty that's in the details around you.

Aside from the fact that fish feed the most at sunrise and sunset, those are often the most beautiful times of the day. Case in point.


Here's something else that's beautiful - my daughter.


Who says you can't combine soccer and fishing?


When you fish with kids, the fish aren't always big.  But the moments are huge.  Here's a photo of my daughter and her friend fishing together.


Here's a picture of that same young man catching his first fish.


Not a big fish, but a huge moment.  Tight lines!


Saturday, April 18, 2015

Hair Rig and Catfish

I geared up this morning the same way I do anytime I fish in town.  One pole had a hair baited with corn for carp.  The other simply had a hook and worm for catfish.

I did catch a couple of carp in the 3 - 4 lbs range, but the catfish were just as interested in the corn as they were in the worms.  That didn't surprise me.  What did catch me off guard is how well the hair rig landed them.  See below.


You'll notice the hair with corn off to one side.  The fish was caught on the bare hook.  Take a closer look below.


I caught a variety of small catfish today using both poles.  They ranged from just over fingerling to just over a pound.  I also caught one bluegill on the hair rig.

Now that it's staying warm, fish of all varieties are biting. Here in town, you need a fishing license if you're under 17.  There's also a two pole limit.

I recommend going at sunrise.  There's lots of feeding activity then.  Also there's this.


Tight lines!


Tuesday, April 14, 2015

Baiting the Hair Rig

Congrats on tying a hair rig!  Now let's bait it.  The process is both simple and frustrating, but we'll get through it together!

First, you'll need a bait needle.  Since bait needles aren't as readily available here as in the U.K., I recommend a crochet needle.  It's basically the same thing.  Get the smallest one Walmart has to offer.


You can see the tiny hook on the crochet needle in the next photo.


Step one is to place that end of the needle through the bait.  In this example, our bait is whole kernel sweet corn straight from the can.


Next we use the tiny hook on the tip of the needle to grab the loop at the bottom of the hair.


Now pull the hair back through the corn.


The size of the hair will determine how many pieces can be placed on it.  I put five on this one.


The only thing we need now is a bait stop.  This is an object at the bottom that keeps the bait from sliding off the hair.  There are plastic bait stops, but I think that using something natural runs less chance of spooking the fish.  Below is a twig I found.


When you have a hair that's stacked with bait, sliding a twig between the last piece of bait and the loop can be tricky.  I recommend using the crochet needle to assist with this.


Now slide the needle out, using your fingers to keep the twig from coming out with it.  Then pull the corn down flush against the twig.


Notice that I shortened the twig by breaking a piece of it off.  It is still long enough to hold the bait, but it no longer protrudes out from each side of the bait.

If you want to check your work, grab the braid above the hook and jiggle the whole thing.  If the bait and bait stop stay in place, it's time to cast!

Tight lines!


Saturday, April 11, 2015

Carp Hooks

By now, you know my fishing philosophy.  Keep it fun, and keep it simple.  All you really need on any given trip is a hook and some bait.

That said, as you fish more, you'll probably hone in on certain fish species that you like to catch more than most.  Here in the U.S., bass are king, followed by catfish as a close second.

In Britain and Europe, carp seem to be king.  Here in Texas, because of their abundance, size, and fight, I find myself more and more on the carp bandwagon.

When you zero in on a particular fish species, you have a couple of options.  Keep doing what you've been doing.  That's one option.  Another is to dedicate a pole to that particular fish.  Then you can customize the rigging on that pole for carp, bass, catfish, or whatever it might be.

As you may have guessed, I've dedicated a poll to carp.  I've taught myself the hair rig, which I highly recommend for carping.  But, in my opinion, all of that does you no good without the right hook.

There are hooks specifically designed for carp, and they look much different than the typical baitholder or even plain shank hooks available most places.  Take a look below.


On the left is a size 4 baitholder.  On the right is a size 4 carp hook.  The carp hook has no barbs except for the one on the tip.  That one barb on the tip is all you need, if barbed hooks are legal in your area.

Another difference is the shaft of the hook.  You can see that the shaft of the carp hook is much shorter.  This, along with the lighter weight of the carp hook, makes it easier for the fish to inhale.

Last but not least, the carp hook has a rounder shape on the business end, with the point slightly inverted toward the shaft.  This means that the carp doesn't immediately feel the hook tip, which increases the chances that the fish will keep inhaling far enough to get hooked.

I realize that these hooks are not readily available in all stores here in the States.  Just order online.  You can get a container with hundreds of carp hooks in various sizes for relatively cheap.


They will help you land one of these.


I thought a size 4 hook would be good for the purposes of this post.  It gives you a clear view.  However, the smaller the hook, the better your chances, even with the big carp.  I'd recommend starting with a size 6.

Tight lines!


Monday, April 6, 2015

Tying the Hair Rig: Step 3 - Rigging to the Main Line

You could tie the end of the braid directly to the main line, but I don't recommend it.  The best way to connect the braid to the main line is to use a barrel swivel with an interlocking snap.  See below.


Here's a closer look.


You'll want to use an improved fisherman's knot to attach the end of the swivel without the snap to the main line.  

Don't tie anything directly to the end of the swivel with the snap or to the snap itself.   Instead, you'll tie a loop knot at the top of your braid.  See below.


Please forgive the rudimentary level of the hair above.  It was one of the first I tried, and it taught me  NOT to use a hook with barbs.  Nonetheless, you can see the loop I made at the top of the braid.

Using that loop on top allows you to form hairs with several different hooks and then switch them out in a snap, literally.  See below.


Remember, unlike what's shown in the pics above, use a barbless aka plain shank hook.

Tight lines!

Tying the Hair Rig: Step 2 - Hair to Hook

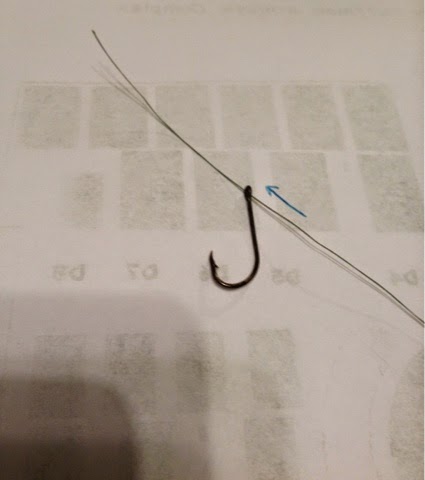
Hopefully by now you've had a chance to tie a few hairs of your own and practice getting the loop smaller.  Now we need to attach it to the hook.  In order to allow this rig to work properly, you must pass the top of your braid through the BACK of the hook's eye.  See below.


Next up, we pull the hair toward the hook.


In the picture above, I probably have the hair a bit too close to the hook.  The beauty is that you haven't tied it yet, so adjust as you please.  Generally speaking, the larger the bait, the longer your hair will need to be.  Corn will not require as long a hair as boilies.

When the hair length is where you want it, you need to place it right against the back of the hook shaft.  Then take the braid you passed through the hook eye and wrap it clockwise around both the hair portion and the shaft.


Many carp anglers recommend wrapping the line at least seven times.  I would say that you may need to wrap it a few more times.  When the fish takes the hair, you don't want the hook to be far behind.

After you're comfortable with the number of times you've wrapped the braid, pass the end of it through the back of the hook eye one more time.


Now pull the top end of the braid tight, and you have a hair rig attached to the hook.  


Just a couple of notes on the type of hook that's most compatible with the hair rig.  First, it needs to be a plain shank.  In other words, no little barbs on the back.  Second, I wouldn't go bigger than a size 4.

Size 4 is what I used for this demo, but I would probably start out with a six.  Even the bigger carp have small sucker-type mouths.

In the next post, I'll show you how to attach this whole thing to the main line.

Tight lines!


Sunday, April 5, 2015

Tying the Hair Rig: Step 1 - Loop Knot

I recommend ordering a set of pre-tied hair rigs from England to start with.  These hairs will be ready for immediate use.  They'll also provide a good model from which you can tie your own.  After you see the price on your order, you'll understand why learning to tie your own is essential.

First, let's talk line.  I recommend 20lbs braid.  It's extremely strong yet extremely nimble.  Braid is also easy to work with.


I would recommend cutting off a looong piece of braid, say 18 inches.  Give yourself plenty of line.


After you cut a piece of braid, the first thing you'll do is double it up.  Think of this as a snake.


You will then form a large loop by coiling the snake's body back on itself.


Now you're looking at two loops.  The large one is the body of the snake.  The smaller one is the head.  Next you will wrap the smaller loop around the top of the bigger loop TWICE.


Now pull it tight.  Below is what you'll get.


That loop is probably too big, but it works for demo purposes.  The thing you'll have to practice on is getting that final loop smaller and tighter.

After you form the loop, cut the excess line off of one side.  Make the cut close to the knot, as below.


If you gave yourself plenty of line to start with, then the one line coming from the loop should still be around ten inches in length.  You'll also notice that the loop in the picture above is smaller.  That's because I tied another hair and was able to get a better result.  Practice ultimately makes perfect.

Pictured below is our end goal.  We have lots of steps to talk about, so stay tuned. Here's how small the pro's get that loop.


You see, the loop's only purpose is to hold a twig or some other small thing to keep the bait on that line.

So now that we know how to tie the loop, stay tuned to find out how we'll tie it to the hook.

Tight lines!


Saturday, April 4, 2015

5 lbs Carp!

My friends, I'm now sold on the hair rig!  If you read my last post, you know that I ordered some from jolly old England a few weeks ago.  You also know that I tested it with my daughter, and she caught big and small carp.

Today, it was my turn.  It was too cold to take the kids, so I flew solo.  I used the same hair rig that my daughter used last week, and the results were ... well ... BIG!


That, my friends is a 5 lbs carp.


Sorry if its head's a bit dirty in the photo above.  It's not easy to keep a slimey fish that size from slipping off the scale.  Equally impressive was the length, at 2 feet.


I was blessed to catch one more carp before the day was over, on the same hair rig.  It was smaller at just over 2.5lbs.


What it lacked in weight, it made up for in length at 22 inches.


It turns out that carp are not the only fish who like the hair rig.  Check out this little blue gill that took the bait.


There were also a few small catfish that bit on nightcrawlers.


This was a very successful trip, even though the temperature was in the 40's when I started.  I think there were several factors that came together for success.  

Chief among these factors was using the right bait.  Today's baits were whole kernel sweet corn and worms.  If fish don't hit these, then they're not biting.  

Of course, I poured the juice from the can of corn into the water directly in front of me.  I call this ringing the dinner bell.  I followed it up by chumming generous amounts of corn as well.

Last but not least, I scoped out an area that seemed fish friendly.  Even in smaller bodies of water like playas, structure matters.  Look for points like this one.


Also look for areas where deeper water cuts under the bank.


Big fish often hold up in these.  Just be sure to test the bank for stability.  This is best done with a large walking stick or something of the sort.  

You need to make sure that the water beneath hasn't softened the bank to the point that it will collapse under your weight!  You'll notice in the picture that my chair is NOT sitting directly atop this hollowed out area.  It's a bit further back.

Tight lines!